How to punch down a Cat5e/Cat6 keystone jack, step-by-step instructions. I took a bunch of pictures along the way to better explain the process, and to let you see just what it should look like. If you want to see the process of punching down a Cat5e or Cat6 jack on video, scroll to the bottom of this post. To get started, let's take a look at what tools you will need:
Electricians Scissors (regular household scissors will work also)

Wire Stripper (you can use electricians scissors if you don't have any wire strippers)

Punch Down Tool with 110 Blade

Punch Down Palm Tool (optional)


Now that we have all the tools, let's punch down some keystone jacks.
First, strip off at least 1 inch of jacket on your Cat5e/Cat6 cable. Make sure not to cut into the wires. If you do, you'll need to start over. This picture shows what the two cables look like side by side. The Cat6 cable is larger (bottom) due to the separator between the pairs.

Cut off the ripcord

If you using Cat6 cable, it should have a separator. Cut that off as well. Simply pull the 4 pairs of wire back and cut it off

Now were ready to lace up the wires on the keystone jack. This style of jack is very user friendly and great for beginners or professional installers. You can see 110s are in a single row and that they are pointed, making it easier to lace the wires down
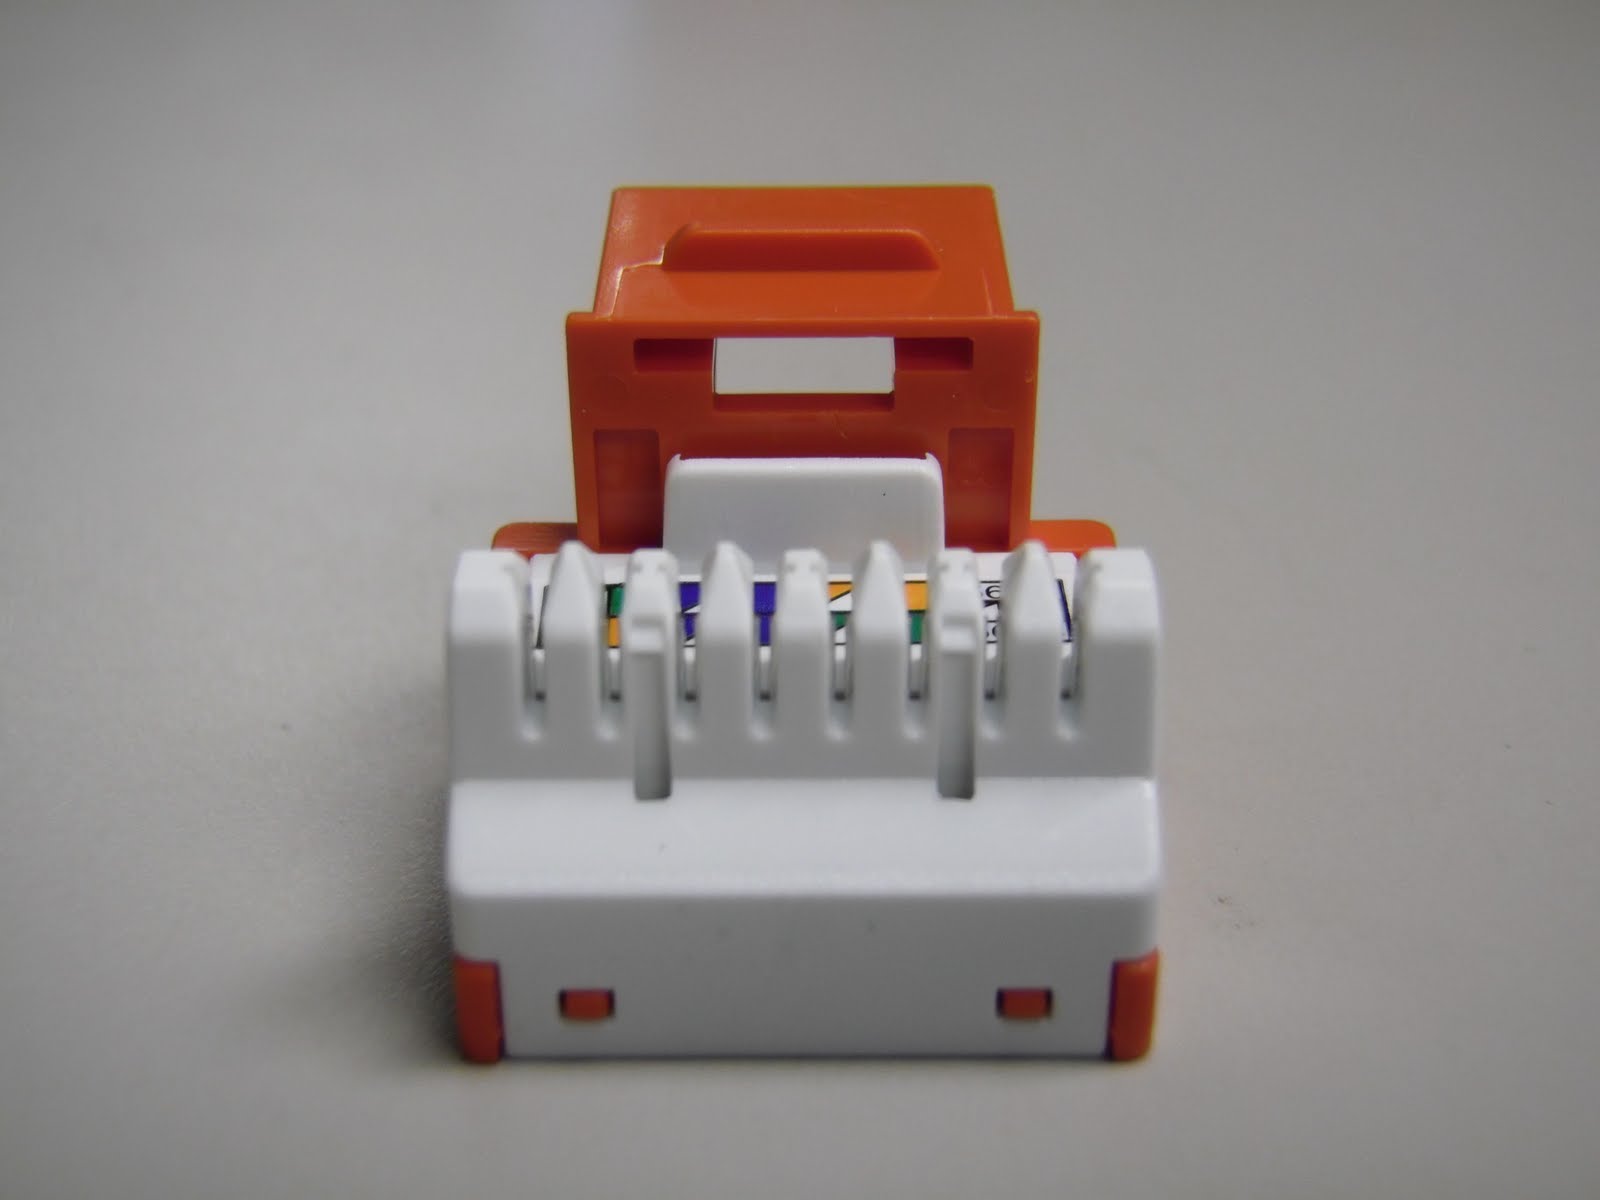
Let's go ahead and wire these keystone jacks following the 568b Wiring Diagram

You can see the keystone jack has the color code for 568A and 568B on the jack. They are very similar, but 568B is most commonly used nowadays.

Once all the wires are laid down, your keystone jack should look like this. Notice how I left the pairs of wire twisted. I was able to do this because of the pointed ridges on the jack, making it much easier to set the wires in. Many other styles of jacks out there have a flat surface, requiring you to untwist all 4 pairs of wire down to the jacket. Also notice how the jacket of the cable is right up against the keystone jack. You don't want any more than 1/2" of the wires exposed.

Once you have the wires laced in correctly, set your keystone jack in a jack palm tool. If you don't have one of these available, you can punch the jack down on the ground or a desk, but I suggest putting a piece of cardboard down to prevent the jack from slipping out when you punch them down. I would strongly suggest AGAINST using your hand to punch down jacks without the use of this tool. The jack can slip out and the tool will cut right through your hand. Not a pretty site

Now, take your punch tool and find the side that says "CUT". You want to make sure the tool faces the correct way, or you'll cut the wrong side of the wires off. This is how your tool should look when punching down the jack. Notice the pointy tip on the left side of the 110s

A close up view of the 110 blade shows this better

Once the punch down tool is positioned correctly, push down firmly until you feel it pop. You should see the wire cut off. If it doesn't, you may need to do it once more. Here you can see I terminated the brown pair

Repeat with the other 3 pairs of wires and you have a completed keystone jack. It will look like this. Note how the jacket is very close to the jack. You want to make sure you keep it as close as possible.


Now let's watch it on video

Once you have the wires laced in correctly, set your keystone jack in a jack palm tool. If you don't have one of these available, you can punch the jack down on the ground or a desk, but I suggest putting a piece of cardboard down to prevent the jack from slipping out when you punch them down. I would strongly suggest AGAINST using your hand to punch down jacks without the use of this tool. The jack can slip out and the tool will cut right through your hand. Not a pretty site

Now, take your punch tool and find the side that says "CUT". You want to make sure the tool faces the correct way, or you'll cut the wrong side of the wires off. This is how your tool should look when punching down the jack. Notice the pointy tip on the left side of the 110s

A close up view of the 110 blade shows this better


Repeat with the other 3 pairs of wires and you have a completed keystone jack. It will look like this. Note how the jacket is very close to the jack. You want to make sure you keep it as close as possible.

Here is a picture or the WRONG way. The cable jacket is stripped too far back, exposing more than 1/2" of the wires

Lastly, press the clear dust cover on your jack and your DONE

Now let's watch it on video
New Tool Available!
Want to terminate Cat5e/Cat6 jacks quicker? Try the Kwik Tool and Kwik Jacks, available at Discount-Low-Voltage.com. Read the instructions for Terminating Cat5e/Cat6 Kwik Jacks here. The Kwik Tool removed the need for buying the punch down tool, 110 blade and palm tool. Safer, faster and less expensive. Call us for details on how to get a free Kwik Tool today! (888) 797-3697
Want to terminate Cat5e/Cat6 jacks quicker? Try the Kwik Tool and Kwik Jacks, available at Discount-Low-Voltage.com. Read the instructions for Terminating Cat5e/Cat6 Kwik Jacks here. The Kwik Tool removed the need for buying the punch down tool, 110 blade and palm tool. Safer, faster and less expensive. Call us for details on how to get a free Kwik Tool today! (888) 797-3697
We hope you enjoyed this article on how to punch down Cat5e/Cat6 keystone jacks. Feel free to leave comments or suggestions in the comment box below and thanks for visiting.
Related Posts:
Still have questions? You can reach us at (888) 797-3697
Visit our website at Discount-Low-Voltage.com to order any of the items seen in this article.
This is great information very well presented. Kudo's to you!
ReplyDeleteDo I punch down wall sockets the same, or reverse?
ReplyDeleteStawsh,
ReplyDeleteThanks
Kirk,
I think were talking about the same thing here. Once you have completed punching down the Cat5e/Cat6 keystone jack, it gets inserted into a wall plate and mounted in the wall. You do both ends using the same wiring pattern (568a or 568b). Does this answer your question? If not, you can contact me directly at k.atkins@discount-low-voltage.com
Just to point out an inconsistency with your screenshots; you say you're going to follow the 568B diagram, but your twisted pairs are all kept side-by-side in subsequent pictures. This is going to cause problems, as the green pair should be separated on either side of the blue pair.
ReplyDeleteYou may encounter problems with the twisting of unexpected signals together.
Scratch my above comment; I had not noticed that the jack itself apparently does the "flip" within its own architecture. When in doubt, follow the labeling!
ReplyDelete