After hunkering down for a while you might find yourself buried alive under the amount of low voltage networking information.
While crawling and running in the trench you'll bump into fellow soldiers cat5e, fiber optic cable, security cameras. You'll also find tutorials, tips, installation aids and all kinds of cool networking stuff!
The commander and chief is Discount-Low-Voltage.com
Pre-terminated fiber optic cable assemblies cut installation time and cost drastically. Many people unfamiliar with fiber optic cable and termination believe it to be very complex, fragile and expensive. Pre-terminated fiber optic cable offers a fast, simple and reliable solution that also installs in half the time of traditional field terminated systems.
Traditional premise fiber optic cables, hardware, fusion splicing and connection in the field have remained more or less the same over time. Trying to hurry the installation process using these old methods carries a risk that quality and reliability can suffer. As a result, the final deployment can be more costly and slower, and can significantly affect the production environment. Generally speaking, it all becomes more complex and costly than is strictly necessary.
Brian Miller from Miller communications has made purchases for this cable from Discount-Low-Voltage.com and he was nice enough to give us a phone interview about his experience after his installation. Let's see what he had to say:
Fiber cable preterminated is available in a single-mode, 50µm, or 62.5 µm, and loose tube outside plant or flame retardant indoor/outdoor cable carrying from six to 144 fibers and just about any other fiber you can think of.
This solution will require slightly more time in the design phase spent in determining and measuring appropriate lengths, spacing and technical requirements. Long term expansion and growth can be easily planned during this time. Time spent early in the design phase results in reduced time spent in the field installation phase.
You can order this cable in any length, with any connectors and any fiber type your application calls out for. Order online or call us at 888-797-3697
Special thanks to Brian Miller from Miller communications. If your looking for phone system and communications work in the pacific northwest call him at 503-244-9714.
Instructions for splicing fiber optic cable with the AFL CS004162 mechanical splice kit. Watch quick overview video at bottom of post.
1.0 GENERAL 1.01 These instructions describe the operation of the SpliceConnect™ Universal Mechanical Splicing Tool. Please be sure to read these instructions carefully before proceeding.
WARNING: Always wear eye protection when handling optical fibers. Dispose of any cut or cleaved ends properly. Do not touch the wedge with bare hands.
2.0 INSTALLATION 2.01 Identify components of the kit. (see Figure 1)
2.02 Securely set the mechanical splice into the tool with the “F” logo upside down and on the left side. (see Figure 2)
2.03 Push the Red lever fully to engage the wedge into the splice. (see Figure 3)
2.04 Avoid damage to the fibers by making sure the fiber holder grooves and stripper are free of dust. (see Figure 4)
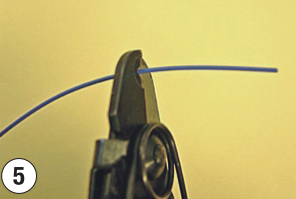
2.05 For 250µm: Mark 35mm from the end of the fiber. Strip the fiber to the mark. Clean the bare fiber. (see Figure 5)
For 900µm: Mark 35mm from the end of the fiber. Strip the fiber to the mark by removing 7mm at one time. Clean the bare fiber. (see Figure 5)
2.06 For 250µm: Place end of the fiber coating at the 10mm mark on the cleaver and cleave the bare fiber. The result is 10mm of bare fiber remaining after cleave. (see Figure 6)
For 900µm: Place end of the fiber coating at the 15mm mark on the cleaver and cleave the bare fiber. The result is 15mm of bare fiber remaining after cleave. (see Figure 6)
2.07 For 250µm: Set the fiber onto the holder with a protrusion of 25mm (10mm of bare fiber and 15mm of buffer coating). Gripping the front portion of the holder, slide the clamp downwards to lock the fiber. (see Figure 7)
For 900µm: Set the fiber onto the holder with a protrusion of 25mm (15mm of bare fiber and 10mm of buffer coating). (see Figure 7)
2.08 Set the fiber holder in the tool in line with the arrows on the rail. The fiber end should coincide with the tip of the fiber guide. (see Figures 8 and 9)
2.09 Slide the fiber holder forward until it is secured by the fiber holder lock. (see Figures 10 and 11)
2.10 Repeat steps 2.05 through 2.09 for the opposite fiber.
2.11 Insert opposite side of holder and fiber should bend on the side of the inserted holder. (see Figures 12 and 13)
(Except for 250µm to 900µm, the fiber on the opposite side of the inserted fiber holder should bend. (see Figure 14)
2.12 Press down the fiber bend and the opposite side should form a bend. (see Figures 15 and 16)
2.13 Balance the fiber bends on both sides. If the fiber bends cannot be balanced, restart the process with a new mechanical splice. (see Figures 17 and 18)
2.14 When the fiber bends on both sides are balanced, push the yellow lever to disengage the wedge. Fiber splice is completed. (see Figure 19)
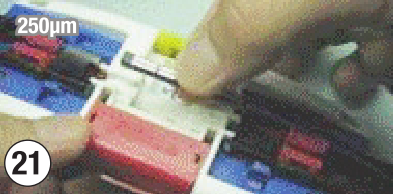
2.15 For 250µm: Release the fibers from the fiber holder by sliding the clamps towards the splice side. Make sure the fiber does not get caught by any part of the splice tool. Remove the splice gently. (see Figures 20 and 21)
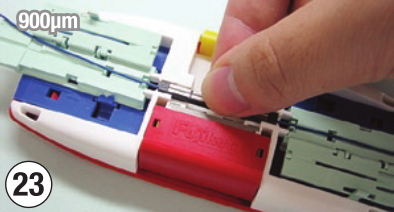
For 900µm: Release the fibers from fiber holders by opening the fiber holder covers. Make sure the fiber does not get caught by any part of the splice tool. Remove the splice gently. (see Figures 22 and 23)
2.16 Slide the fiber holder backwards and remove it from the lock. Do not keep the fiber holders locked in the tool. (see Figures 24 and 25)
Prizes up for Grabs: 1st Place - 32" LCD Flat Screen TV + Wall Mount Bracket (combined value of $366) 2nd Place - $50 Discount-Low-Voltage.com Gift Card 3rd Place - $25 Discount-Low-Voltage.com Gift Card
The 1st Place Winner is...
Mike Cosman (Cosmo19), from Sharon MA
The 2nd Place Winner is...
Sloan Venables (sloansterling), from Reno NV
The 3rd Place Winner is...
Cheryl Lovell (BlueRooster), from San Luis Obispo CA
Thanks to all who participated. We appreciate all the great feedback you gave us. Make sure to keep an eye out for future Sweepstakes and Giveaways from Discount-Low-Voltage.com. Click here to "Like" us on Facebook. You'll be the first to hear about new giveaways, coupon codes, and more.