Let's take a look at the difference in size of the residential IR bullet cameras vs the IR cameras for commercial use.
Discount-Low-Voltage.com
Related Posts:
Day Night Security Camera Video
IR Bullet Security Camera Video - ECZ230
CCTV Glossary of Common Terms and Definitions
Everfocus 4 Camera CCTV Package with DVR
Thursday, December 10, 2009


Wednesday, December 9, 2009
How To Terminate Cat6A Shielded Keystone Jacks
In today's article, I'll explain How To Terminate Cat6A Shielded Keystone Jacks. Cat6A shielded keystone jacks may look intimidating, but they are no harder to terminate then your standard Cat6 keystone jack. There's a few more steps involved, but overall anyone can terminate these jacks. So let's take a look at some of the tools required:




Still have questions about how to terminate cat6a keystone jacks? Give us a call at (888) 797-3697. Visit our website at Discount-Low-Voltage.com to order any of the items seen in this article.
You'll need Wire Strippers, Pliers, Cable Cutter, Cat6a Shielded Keystone Jacks, and Cat6a Shielded Bulk Cable

Let's get started:
Step 1: Strip back about 2" of the cables jacket

Step 2: Cut off the outer plastic

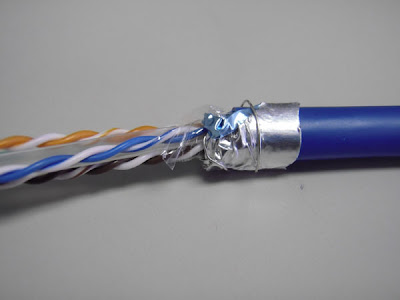
Step 3: Pull back the foil and drain wire

Step 4: Cut off the inner plastic

Step 5: Cut the foil, leaving about 1/4" and wrap it around the cable. (Note: it will not completely wrap around the cable, this is normal). Then wrap the drain wire completely around the foil

Step 6: Pull back all 4 pairs of wires and cut off the center spline

Step 7: Run the wires up through the cap and lay the wires in the appropriate slots according to the 568B wiring diagram

Step 8: Trim the wires flush with the cap

Step 9: Insert the cap into the Cat6A keystone jack. Notice that the jack and the cap have arrows on them. Make sure they are both pointing the same direction.

Step 10: Close the jaw all the way until it clicks

Step 10a: If your having trouble closing the jaw, open it back up and push down on both sides of the cap. This will seat the wires. I just used a regular pair of scissors.

Step 10b: Now do the other side

Step 11: Push the shielding lug up against the cable

Step 11a: I got a much tighter seal by using pliers

Step 12: Install the included zip-tie to make sure nothing comes loose and your done. This is a completed Cat6A shielded keystone jack.

In the event that your Cat6A keystone jack isn't working properly, you will need to cut off the zip-tie, pull back the shielding lug and insert a small flat head screwdriver into the slot, twist and it will pop open. We hope this article covered everything you need to know about terminating Cat6A keystone jacks.
Still have questions about how to terminate cat6a keystone jacks? Give us a call at (888) 797-3697. Visit our website at Discount-Low-Voltage.com to order any of the items seen in this article.
Related Posts:
Tuesday, December 8, 2009
HellermannTyton SwiftMark Automatic Label Printer Video
HellermannTyton, a global manufacturer of identification and cable management solutions, announces the release of the SwiftMark Label Printer and Applicator. This innovative product prints labels and automatically applies them to wire and cable, offering exponential time savings for high volume labeling applications. With the fastest cycle time and the largest wire range on the market, the SwiftMark offers dependable performance and includes many features to increase efficiency. Cables from .06” to .75” in diameter are simply placed or fed into the machine and wrapped in four seconds or less. The SwiftMark can accommodate a wide variety of cables, including single conductor cables with various insulation types and some cable bundles and preterminated cables.
The SwiftMark has a touch screen LCD interface, and label data can be transferred from a PC to the SwiftMark using a USB port, serial port, parallel port, or SD memory card. Labels are easy to produce using the accompanying TagPrint Pro labeling software. The SwiftMark’s 300 d.p.i. thermal transfer printer uses self-laminating adhesive labels and conserves printer ribbon. The labels are applied directly after being printed. The SwiftMark is able to apply labels within a half-inch of the end of a cable or connector using adjustable wire grippers which secure the wire as close as possible to the label. The SwiftMark stands up to the demands of mass labeling applications, while offering customized features to meet specific labeling requirements.
HellermannTyton also has a well developed infrastructure for service and support, ensuring the SwiftMark will always be running at optimal levels.
- Fastest cycle time in the industry
- Touch screen LCD
- Marks to within .5” of the end of the cable
- Labels cables from .06" to .75" in diameter
- Works with various sizes of self-laminating adhesive labels
- Ribbon save feature minimizes ribbon usage by up to 85%
- 300 d.p.i. thermal transfer printer
- Stores label files on removable SD card
- USB, parallel port, and serial connections
- Accommodates various types of cables
- Eliminates label wrinkles or "flags"
- Adjustable wire grippers
- Easy to load with labels and ribbon
- Automatically keeps track of application cycles
- Foot pedal, touch screen, and 24V wrap initiation options
- Electric universal power supply
Or call us at (888) 797-3697
Wednesday, December 2, 2009
How To Terminate Cat5e/Cat6 Kwik Jacks Using the Kwik Tool
The Kwik Jacks and Kwik Tool are the newest addition of keystone jacks to the Discount-Low-Voltage.com lineup. We first introduced them back in January of this year and have had nothing but great feedback for the Kwik Jacks. Today, Im going to show you step-by-step How To Terminate the Cat5e/Cat6 Kwik Jacks. I'll include photos and a video to help you along the way. Let's get started.
Blog Updated 6-15-11: New Kwik Tool design
What You Need:


Make sure the jacket on your cable is as close to the keystone jack as possible. You don't want anymore than 1/2" of the wires exposed. Below is a picture of the WRONG WAY to do it.


Now let's watch Mercy demonstrate this process on video:
Blog Updated 6-15-11: New Kwik Tool design
What You Need:


Electricans Scissors


Now that we have the right tools, lets punch down some keystone jacks
First, strip back the jacket about 1-2". The Cat6 cable (bottom) is larger than the Cat5e cable because it has a center spline, which separates all 4 pairs of wires. This center spline helps reduce Alien Cross-talk.

Cut off the ripcord


Cut off the separator if you're using Cat6 cable


Now were ready to lace up the wires on your keystone jack. One the the nicest features of these jacks is the pointed 110s. This makes it much easier to lay the wires in, compared to the flat style some other keystone jacks have. Here's a close up view. You can also see it clearly shows the 568B and 568A color code on every jack.

Follow the color code on the side of the jacks. We suggest using 568B since it is the most common. Here is a picture of the 568B color code.


You can use your fingernail to seat the wires, or a utility knife. Make sure not to use the sharp side though, or you could cut through the wire jacket. Once all 4 pairs are laid down in the jack, it should look like this.

Make sure the jacket on your cable is as close to the keystone jack as possible. You don't want anymore than 1/2" of the wires exposed. Below is a picture of the WRONG WAY to do it.

Once the 4 pairs of wires are laced onto your Kwik Jack, slide the jack into the Kwik Tool
Updated 6-15-11: New Kwik Tool design
Here is what the Kwik Jack looks like inserted into the Kwik Tool
Once you have the Kwik Jack in the tool, simply squeeze down on the handle and release. This will punch down and cut all 4 pairs of wires. Remove the Kwik Jack from the tool. Here is a completed Cat5e/Cat6 Kwik Jack
Tip: You can also use a 110 punch tool to terminate the Kwik Jacks
Tip: You can also use a 110 punch tool to terminate the Kwik Jacks

Now, snap on the included dust cover and you're done.

Now let's watch Mercy demonstrate this process on video:
We hope our article on How To Terminate Cat5e/Cat6 Kwik Jacks Using the Kwik Tool was helpful. For more information, or to order any of these items, visit our website at Discount-Low-Voltage.com
Related Posts:
How To Punch Down Cat5e/Cat6 Keystone Jacks (using a 110 punch tool)
Tuesday, December 1, 2009
Time Lapse Video of Vertex Communications Drilling Through Concrete
Here is a cool video sent to us by a customer, Vertex Communications. In this video they demonstrate the process of drilling a hole through concrete in the library for the City of El Segundo. Enjoy
Thanks for the video guys!
To contact Vertex Communications, visit 4Vertex.com
Thanks for the video guys!
To contact Vertex Communications, visit 4Vertex.com
Subscribe to:
Posts (Atom)